Web & Digital Communications has created a number of pre-written elements you can use on your web pages. These elements are called Snippets and because they have been pre-written, you will have easy access to some complex design and content elements to make your pages look great.
Please follow this basic information for using a Snippet, but also view the Snippet Showcase with working examples of each snippet and item-specific documentation in the Help Center.
Note: In most cases, if you intend to add content to your web page in addition to what is covered in the Snippet, it is best to add it before inserting the Snippet content.
In this article
- Adding a snippet
- Editing a Snippet in the table transform
- Inputting content into your snippet
- Adding Rows in the table transform
- Deleting a Snippet
Adding a snippet
- Open the CMS Editor, typically in the Main Content Region.

- Click the Snippet icon, it looks like a puzzle piece.

- You will be able to use the Snippet dialog box to select the kind of Snippet you would like to use
- After inserting your Snippet, you will be able to edit the content.
Editing a Snippet in the table transform
Once you have inserted a Snippet into the CMS Editor, you will be viewing the item under development as a table transform. This means it will appear as a table during the editing process and you will be able to input necessary information into the rows and columns. Follow the item-specific instructions as you create your Snippets. Once you have saved and are previewing your web page, the table will transform into the specific item you wish to create, such as a video, image with the caption, or otherwise.
Once you have inserted a Snippet into the CMS editor, you will be viewing the item under development as a "table transform". This means it will appear as a table during the editing process and you will be able to input necessary information into the rows and columns.
Example Snippet Under Development

Once you have saved and are previewing your web page, the table will transform into the specific item you wish to create, such as a video, image with caption, or otherwise.
Example Snippet Once Saved

Adding a Snippet
In most cases, if you intend to add content to your web page in addition to what is covered in the Snippet, it is best to add it before inserting the Snippet content. Add all of your textual content, then add your Snippet in the desired location by clicking into the text where you wish to place a Snippet. Next, use the Snippet tool to select your Snippet.
Inputting content into your snippet
Follow the item-specific instructions as you create your Snippets. White rows and columns indicate an input field and descriptions or instructions will follow each field.
Do not delete columns or rows unless otherwise indicated in the instructions or else the table may not properly render on the live version of your page. If you accidentally delete a row or column, you will need to delete the entire existing Snippet and reinsert it.
Adding Rows in the table transform
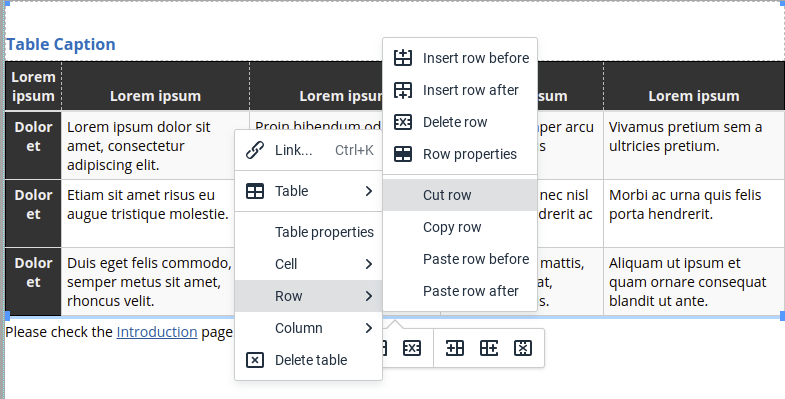
In many cases, you may wish to add input fields. Perhaps you would like to create a series of five images with captions, but the Snippet for this is preset with four images.

You can easily add rows by clicking into one of the white input rows, then using the Table drop-down from the editor toolbar, as shown below.

Deleting a Snippet
- To delete an entire Snippet, click into any of the white input fields.
- Next, look for the Path toolbar at the bottom of the editor.

- Click the left-most item, "Table." This action will manually select the entire Snippet.
- On your keyboard, click backspace or delete.
- Your Snippet will be deleted.
Want to see this in action?
Re-watch this video segment from our Basic Web Editing training video.