The CMS allows individuals with little knowledge of web programming or development to create and manage web content with relative ease. A key component of this is the word processor used to input content onto the web page. The CMS uses the What You See Is What You Get (WYSIWYG) Editor, which can be referred to in the same context as Microsoft Word. We call it the "CMS Editor".
Article table of contents
- Checking out and in pages and files
- Editable regions within each page
- How to use the Page Editor in the CMS
- Paste as text
- Remove formatting
- Lists - ordered and unordered
- Headings
- Styles
- Further reading
Checking out and checking in pages and files.
When you want to edit a file in the CMS, you need to check it out first. The CMS uses a simple-yet-effective check-out system, indicated by the light bulb icon.
When the light bulb is empty, the item is available to be checked out.
When it is lit and yellow, it has been checked out by you.
When the icon is a lock, it has been checked out by someone else. What if my webpage is checked out to someone else and is locked in the CMS?
When a page or file is checked out to a user, other users cannot enter the page and make changes until the file has been checked back in. The page is automatically checked out to the user when he or she edits a page by clicking on an editable region button. Likewise, when the user publishes a page it is automatically checked back in.
Editable regions within each page
A web page is comprised of various regions, which are illustrated in the following image:
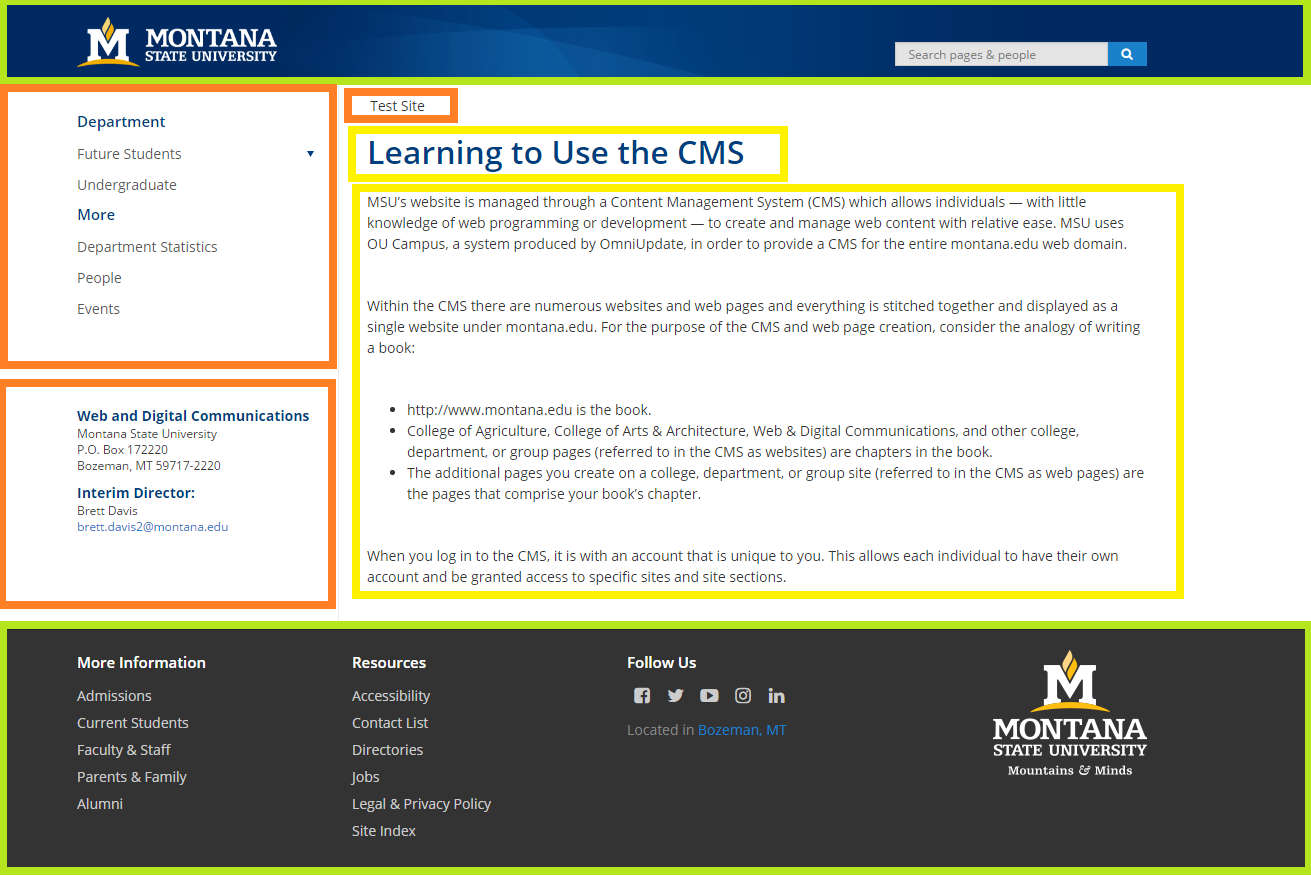
- The banner at the top of the page is called the header and the resources available at the bottom of the page comprise the footer. These two regions, highlighted in green in the image above, are fixed and cannot be customized.
- The navigation sidebar and contact information to the left of the page are customizable but are set by the _sidenav.inc and _contact.inc files at the root of your site. These areas are highlighted in orange.
- The small text just below the banner represents your page’s While this is customizable, in most cases you shouldn’t need to edit this text as it will automatically follow your website’s page structure as you create and edit pages. This region is also highlighted in orange. The remaining space on your web page consists of editable regions. You may add a number of these regions to the page or keep it limited to just a few. The above example shows two editable regions that are highlighted in yellow and include the title of your page as well as the main content. Other editable regions include a subtitle, image banners, additional sidebars, extra contact information, etc. For a complete listing of editable regions please see What editable regions can I add?
Once you are familiar with these regions on the page, you can quickly start editing a webpage.
- Log in to the CMS by navigating to a page on your website and clicking the Direct Edit link.
- Click Content then Pages.
- Check out the page by clicking on the lightbulb from the page specific controls.
- Ensure you are in the Edit mode.
- Click on the green button to open one of the editable regions (the Main Content region, for example.)
- This will open the CMS Editor and you will be able to add content to the region.
- Please remember to save, save, save! For more on saving please visit How do I save my page?.
How to use the Page Editor in the CMS
We discuss Links and Images in two other Help Center articles, so follow one of these if that's what you're looking for:
We'll go over a few other items in the Page Editor briefly.
Paste as text
Especially for those of you bringing content into the CMS from elsewhere (PDFs, Word docs, etc), this is extremely useful. Clicking this button will
Remove Formatting
If you do not use the method above, you can also paste directly and use the remove formatting button. When you copy from a secondary source, that copy/paste operation brings along a lot of unwanted formatting which may look bad on the web, make it hard for you to edit it further, or both.
To use this, select the parts of your text where you would like the formatting removed, or select-all, and click the "remove formatting" button. When you do that, it purges off all styling and takes it right back down to just the pure paragraph, gets rid of bold text, underlines, backgrounds, everything, and cleans it off.
Lists - ordered and un-ordered
Moving right along, we have ordered and un-ordered lists. These work similarly to Microsoft Word where you can either click one of these buttons to start and then input your content, or you can take text already present, select it and turn it into a list.
Headings
Headings are really important for readability, organization, and accessibility.
Headings are meant to be used like sub-chapters in a book, or like a bulleted list. Whereas your big subjects across your page receive Heading 2, then the ideas within can be set to Heading 3, and then your next big idea can be a Heading 2 again.
A few quick things to remember when adding your headings.
- Do not use Heading 1, as that is set aside for your page title and we already use it that way.
- Headings should be used in order going down as earlier described, but you can jump back up.
- Do not use bold text or larger text to "fake" a heading. This will not be recognized by a screen reader (nor any search engine crawlers) and will be read just like the text around it.
Users with disabilities and other tools machine reading your page will navigate and index your content with the headings, especially Heading 2s, so use them well!
Headings via keyboard hotkeys
You can set headings with hotkeys if you're a keyboard enthusiast. You can use shift + alt + 2, for Heading 2, 3 for Heading 2, shift + alt + 3 for Heading 3, etc. This is useful if you copy/paste a bunch of text without any formatting and need to add your headings.
Styles in the editor
Accessible Document Classes
The first 4 are our Accessible Document snippets for marking documents, and we'll talk about those in the accessibility portion of the training, so you can ignore those for now. Find out more in our article How do I link to accessible documents using Accessible Document Classes?
Style Classes
The last 7 are ways to style textual content. Highlight a bit of text and activate one of these and you'll see a box surrounding the text of the specific color.
If you have an important bit of information to which you would like to draw a bit of extra attention, using the styles is a great way to do so. However, make sure you are also using the text to call out the importance of the content, as the screen reader will not read these any differently than other regular text.
For example, "important, midterms due on my desk no later than 5:00 p.m. 5-5-2017". We can add one of the styles, and then as this is something I want people to focus on when they come to the page, we'll put it at the top. And just to make it a little fancier, we can bold the word, "important," and save it.
Further reading
- To edit other regions of your web page visit Editing your Website.
- To add or remove content regions to your page visit How do I add or remove content regions?.
- If you experience rendering problems once you have made changes to a page visit Why aren't my edits taking effect on the live page?.
Want to see this in action?
Re-watch this video segment from our Basic Web Editing training video.